
Create Custom Phishing Templates
The article explains how to create custom phishing email templates using the Phin Template Builder, recommending building HTML and CSS files externally with technical tools like Dreamweaver or Visual Studio before uploading them, and also provides video tutorials, written step-by-step instructions, and resources for previewing, testing, and understanding injected fields in phishing templates.
- 1.Help Center
- 2.Phishing
- 3.Customization
Create Custom Phishing Templates
Whether you upload your own HTML file or use the built-in WZYWG, this article will show you how to create custom phishing templates with the Phin Template Builder.
- Build Externally and Upload via Phin Template Builder (Recommended)
- Build Directly in the Phin Template Builder
- Preview & Test Your Phishing Templates
- Understanding Injected Fields
- Guide to Building Learning Moments
- Email on Acid's Guide to Building Email Templates
Build Externally and Upload via Phin Template Builder
📌 Building externally and uploading via the Template Builder is the recommended way of building phishing templates and is the exact same process used here at Phin to create new phishing templates for our users. It does require the technical knowledge of HTML and CSS to build these files.
Video Tutorial
How to Create Custom Email Templates_Compressed | HubSpot Video
Written Steps w/Images
- 1.Build your HTML file using a text editor such as Dreamweaver, Atom, or Visual Studio.
- 2.Guide to Building Learning Moments
- 3.Start Building with Phin's HTML Template
- 4.Email on Acid's Guide to Building Email Templates
- 5.Navigate to the Template Library page from the side navigation under Phishing.
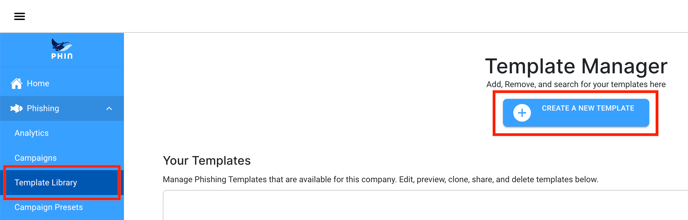 3. Start by clicking the "Create a New Template" button and follow these steps.
- 1.Name Your Template and select "Email" from the dropdown.
- 1.Click the import button, shown in the screenshot below.

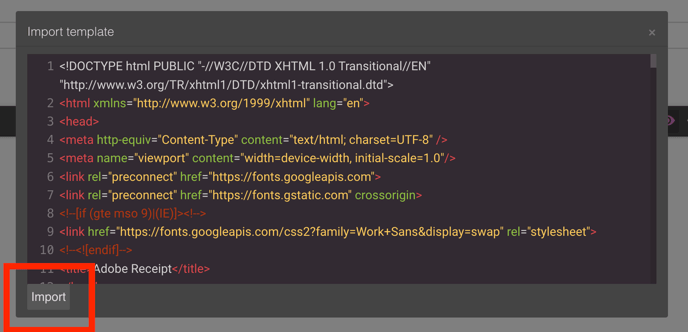
- 2.Copy and paste your HTML template into the import modal and click "Import" in the bottom left.
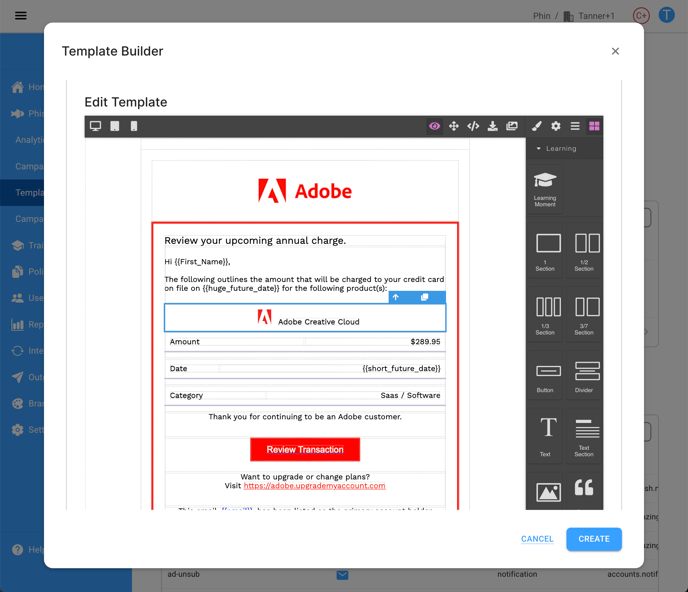
- 3.Now, you should see your template within the "Edit Template" section of the builder.
- 4.Scroll below the preview to fill in the following information:
- 1.
Email Subject
- 2.
Display Name
- 3.
Sending Name (and choose a sending domain from the drop-down*)
- *Bug: The first option in the drop-down selection for sending domain can not be chosen at this time.
- 4.
Learning Type(s)
-
Learning Moment: This option is the default and intended method for phishing templates. Action URLs are transformed into dynamic links that bring an end-user to a learning moment page, which walks them through the data intros and data hints in the template (ordered by the attribute data step).
-
Video: This option gives you the ability to make the result of clicking a link in a phishing template direct the user to a training video. This option is NOT currently recommended as the choice of training videos is outdated, and no learning moment is tracked as complete when a user finishes watching the video.
-
Custom URL: This option gives you the ability to make the result of clicking a link lead to a URL of your choosing. User clicks are tracked in the phishing analytics and reporting; however, learning moments are not tracked as complete.
-
- 5.
Injected Fields- Match the "Field Name", which is determined by you using Mustache HTML injection (ex: ), to one of the values from the "Selected Values" list. If a default value is available, it will be used as a fallback value in the event that a user's data is not available that matches the selected value.
- 6.
Tags - These keywords are used to organize phishing templates by phishing category type (ex, notification, purchase, etc.) in the Phin database, as well as determining which types of phishing templates should be selected for continuous phishing campaigns, which is based on what categories are chosen at the time of launching the campaign. Custom tags cannot be created.
- 1.
- 5.Once you've completed all of the required fields, click the "Save" button in the bottom right corner of the modal.
- 1.Click the import button, shown in the screenshot below.
- 2.Your new phishing template should now be in the "Your Templates" section at the top of the Phishing Template Library. From this view, you can take the following actions:
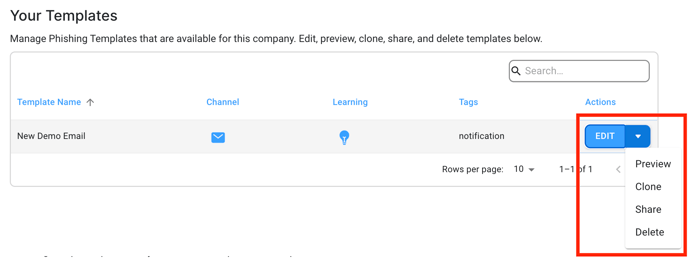
- 3.Preview - This opens the email in a browser window.
- 4.Clone - This duplicates the email template.
- 5.Share - This will create and share a copy of the email template across companies, allowing your newly created phishing templates to be launched to audiences in other companies.
- 6.Delete - This will delete the email template (this will not delete an email template in other companies if shared).
- 7.Celebrate the fact that you just created your very own custom phishing template!
Build Directly in the Phin Template Builder
⚠️ Though possible, building phishing templates using the WZYWG toolset inside of the "Template Builder" is NOT the recommended method for adding phishing templates to your company. Take me to the recommended method for building phishing templates.
Video Tutorial
Build Using the Template Builder_Compressed | HubSpot Video
Written Steps w/Images
- 1.Navigate to the Template Library page from the side navigation under Phishing.
2. Start by clicking the "Create a New Template" button and follow these steps.
- 1.Name Your Template and select "Email" from the dropdown.
- 2.Use the WYZWG component selector on the right side of the screen to build your phishing email.
- ⚠️ We recommend watching the video tutorial to understand the nuances of using the built-in templating tools. This tool is best used to build simple text emails requesting information with a link.
- 3.Once you've completed your email template, scroll below the preview to fill in the following information:
- 1.
Email Subject
- 2.
Display Name
- 3.
Sending Name (and choose a sending domain from the drop-down*)
- *Bug: The first option in the drop-down selection for sending domain can not be chosen at this time.
- 4.
Learning Type(s)
-
Learning Moment: This option is the default and intended method for phishing templates. Action URLs are transformed into dynamic links that bring an end-user to a learning moment page, which walks them through the data intros and data hints in the template (ordered by the attribute data step).
-
Video: This option gives you the ability to make the result of clicking a link in a phishing template direct the user to a training video. This option is NOT currently recommended as the choice of training videos is outdated, and no learning moment is tracked as complete when a user finishes watching the video.
-
Custom URL: This option gives you the ability to make the result of clicking a link lead to a URL of your choosing. User clicks are tracked in the phishing analytics and reporting; however, learning moments are not tracked as complete.
-
- 5.
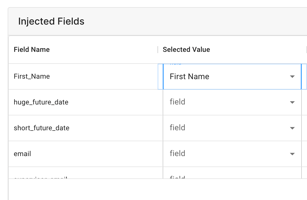
Injected Fields- Match the "Field Name", which is determined by you using Mustache HTML injection (ex: ), to one of the values from the "Selected Values" list. If a default value is available, it will be used as a fallback value in the event that a user's data is not available that matches the selected value.
- 6.
Tags- These keywords are used to organize phishing templates by phishing category type (ex, notification, purchase, etc.) in the Phin database, as well as determining which types of phishing templates should be selected for continuous phishing campaigns, which is based on what categories are chosen at the time of launching the campaign.
- 1.
- 4.Once you've completed all of the required fields, click the "Save" button in the bottom right corner of the modal.
- 5.Your new phishing template should now be in the "Your Templates" section at the top of the Phishing Template Library. From this view, you can take the following actions:
- 6.Preview - This opens the email in a browser window.
- 7.Clone - This duplicates the email template.
- 8.Share - This will create and share a copy of the email template across companies, allowing your newly created phishing templates to be launched to audiences in other companies.
- 9.Delete - This will delete the email template (this will not delete an email template in other companies if shared).
- 10.Celebrate the fact that you just created your very own custom phishing template!
Testing Templates
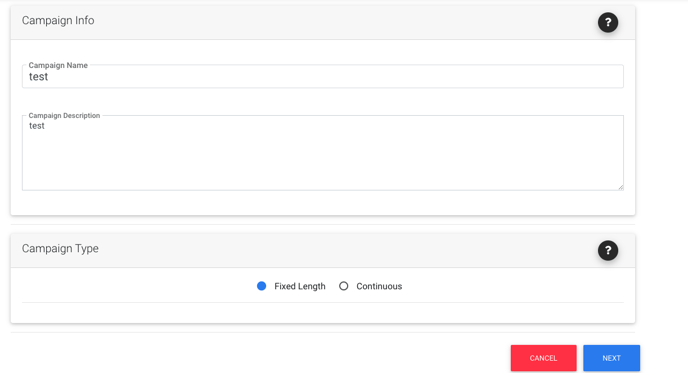
If you want to send yourself an email preview of the template, the most accurate preview of this would be to first navigate to the Phishing Dashboard on the left-hand nav menu. Select "Launch a Phishing Campaign" (this can be discarded and is just for the purpose of sending yourself a test).
Fill in campaign name and description (this can both best "test"). Select 'Fixed Length'.
Select the template that you just created by clicking the blue "+" sign, turning this into a green check mark (which means this will be included in the campaign).
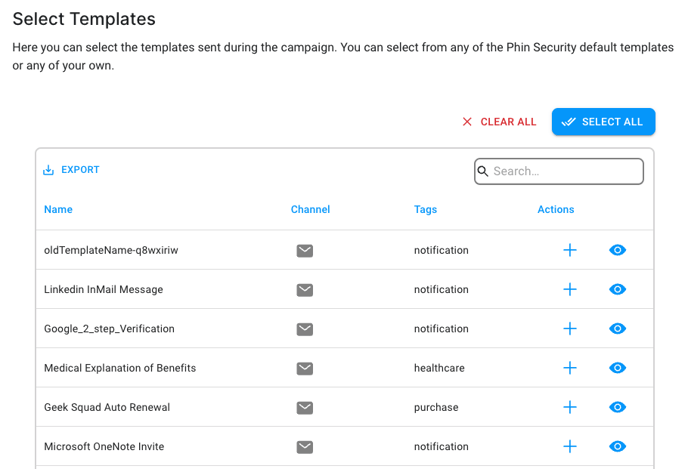
Once this is selected, scroll to the very bottom and under "Publish Options" select "Run a Preview". Enter your email address or whoever is receiving the preview of the template. Once the email populated, select "Run Preview" in the bottom right-hand corner. The email preview should be sent immediately and will reflect how an end user will view the template.
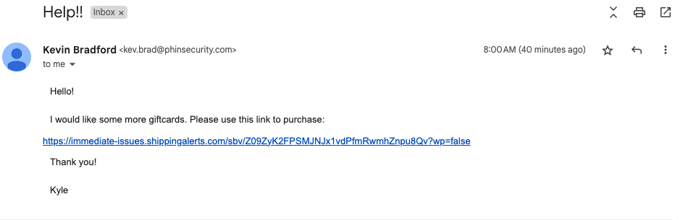
Notice in the example email preview above that the {{action_url}} in the template was turned into a clickable link.
Please feel free to reach out to our team with any questions!
Was this article helpful?
YesNo