
Guide to Building Learning Moments
The "Guide to Building Learning Moments" explains how to create custom phishing training templates using HTML by incorporating three key attributes—data-step to sequence learning steps, data-intro to provide instructional content at each step, and data-hint to offer additional guidance—enabling users to design interactive, step-by-step educational experiences tailored to their audience.
- 1.Help Center
- 2.Phishing
- 3.Customization
Guide to Building Learning Moments
This article will walk you through how to build learning moments within an HTML file so you can create custom phishing templates that speak to your specific audience.
⚠️ This guide assumes you have a novice-level understanding of HTML and HTML attributes. Need to brush up on your HTML knowledge? Check out this resource.
Learning moments consist of three pieces: data steps, data intros, and data hints. In this guide, we will walk through how to use all three pieces to build a template with learning moments the user must step through for the learning moment to be considered complete.
- 1.The data-step syntax looks like this
data-step="[insert_value]". The value in data-step defines which step in the learning moment journey this particular learning moment should be shown. For example, whichever learning moment you want to show first to the user, should havedata-step="1". Here at Phin, we typically (but not always) order the steps based on a top-to-bottom format; that way, the user can click through the learning moments following the natural progression of reading from top-to-bottom. - 2.The data-intro syntax looks like this
data-intro="[insert_value]". The value in data-intro is the information you want to tell the user at this step in the learning moment. - 3.The data-hint syntax looks like this
data-hint="[insert_value]". The value in data-hint is typically the same information included in the data-intro; however, it can also be used to include alternative information that may help drive a longer point than could be made alone in the data-intro it's tied to.
⚠️ Completion of a learning moment is only dependent on an end-user stepping through all data-intros and hitting the "Done" button. Reviewing all data-hints is not a requirement.
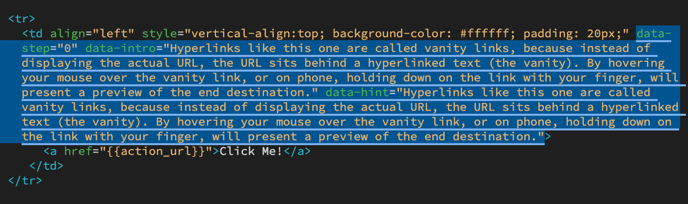
Let's look at how all three of these pieces work together to create a learning moment. Below is a learning moment targeting a simulated malicious "vanity" URL (created using {{action_url}}). The data attributes are highlighted.
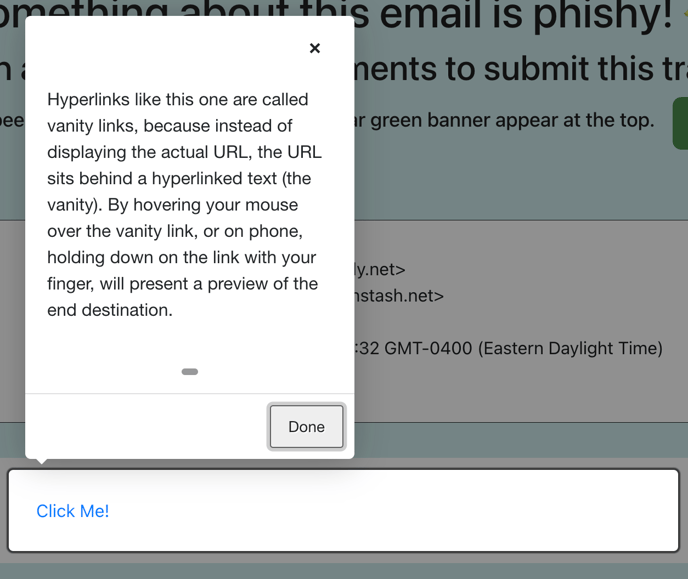
And here's how this translates to a learning moment for the end user.
Now, let's walk through a complete template to see multiple learning moments in action.
Learning Moments | HubSpot Video

Start Building using Phin's Starter Template
The code below can be copied and pasted into a text editor to be used as a starting point for developing a simulated phishing email to be uploaded to the Phin app via the Template Builder.
<!DOCTYPE html PUBLIC "-//W3C//DTD XHTML 1.0 Transitional//EN" "http://www.w3.org/TR/xhtml1/DTD/xhtml1-transitional.dtd"> <html xmlns="http://www.w3.org/1999/xhtml" lang="en"> <head> <meta http-equiv="Content-Type" content="text/html; charset=UTF-8" /> <meta name="viewport" content="width=device-width, initial-scale=1.0"/> <link rel="preconnect" href="https://fonts.googleapis.com"> <link rel="preconnect" href="https://fonts.gstatic.com" crossorigin> <!--[if (gte mso 9)|(IE)]><!--> <link href="https://fonts.googleapis.com/css2?family=Work+Sans&display=swap" rel="stylesheet"> <!--<![endif]--> <title>Replace Title</title> </head> <body style="font-family: Arial, Helvetica, sans-serif; margin: 0; padding: 0; background-color: #ffffff;"> <div style="display: none; font-size: 1px; line-height: 1px; max-height: 0px; max-width: 0px; opacity: 0; overflow: hidden; mso-hide: all;">Replace with preview text. ‌ ‌ ‌ ‌ ‌ ‌ ‌ ‌ ‌ ‌ ‌ ‌ ‌ ‌ ‌ ‌ ‌ ‌ ‌ ‌ ‌ ‌ ‌ ‌ ‌ ‌ ‌ ‌ ‌ ‌ ‌ ‌ ‌ ‌ ‌ ‌ ‌ ‌ ‌ ‌ ‌ ‌ ‌ ‌ ‌ ‌ ‌ ‌ ‌ ‌ ‌ ‌ ‌ ‌ ‌ ‌ ‌ ‌ ‌ ‌ ‌ ‌ ‌ ‌ ‌ ‌ ‌ ‌ ‌ ‌ ‌ ‌ ‌ ‌ ‌ ‌ ‌ ‌ ‌ ‌ ‌ ‌ ‌ ‌ ‌ ‌ ‌ ‌ ‌ ‌ ‌ ‌ ‌ ‌ ‌ ‌ ‌ ‌ ‌ ‌ ‌ ‌ ‌ ‌ ‌ ‌ ‌ ‌ ‌ ‌ ‌ ‌ ‌ ‌ ‌ ‌ ‌ ‌ ‌ ‌ ‌ ‌ ‌ ‌ ‌ ‌ ‌ ‌ ‌ ‌ ‌ ‌</div> <!--[if mso]><table role="presentation" align="center" width="600" border="0" cellspacing="0" cellpadding="0" style="background-color:#FFFFFF;"> <![endif]--> <!--[if !mso]><!--> <table role="presentation" align="center" width="100%" border="0" cellspacing="0" cellpadding="0" style="max-width: 600px; background-color:#FFFFFF;"> <!--<![endif]--> <tr> <!--[if mso]><td align="center" style="vertical-align:top; padding:0px 0px 0px 0px; min-width:600px; background-color:#FFFFFF;"><table role="presentation" align="center" width="600" cellpadding="0" cellspacing="0" border="0" style="background-color:#FFFFFF;"> <![endif]--> <!--[if !mso]><!--> <td align="center" style="vertical-align:top; padding:0px; max-width:600px; background-color:#FFFFFF;"><table role="presentation" align="center" width="100%" cellpadding="0" cellspacing="0" border="0" style="background-color:#FFFFFF;"> <!--<![endif]--> <!-- Start of Content --> <tr> <td align="center" style="vertical-align:top; background-color: #ffffff; padding: 20px;"> Replace content. </td> </tr> <!--End of Content --> </table></td> </tr> </table> </body> </html>
Was this article helpful?
YesNo